Making a cloned hard drive using Macrium Reflect
by PlasticNev
As well as a system image which can be created and stored on an external hard drive for later or rescue use, a different approach is to clone your existing drive completely onto another different hard drive.
You would do this either as a fully exchangeable drive to be put to one side, so it can be swapped in at any time of major trouble such as a failed drive, or as could happen with the latest malware, and find all your files encrypted.
You can also make a clone from an existing small drive when it is getting too full, and put the clone on a larger hard drive for fitting in its place..
Please read through everything and please be sure you understand each stage of making a cloned hard drive before continuing.
You will need a spare hard drive either as big as the system one, or larger. and of the same type, either IDE or SATA.
One of these three, an adapter from IDE or SATA to USB, an enclosure for the spare drive to USB, or a hard drive docking station.
For now we will assume an enclosure with the spare drive fitted to it.
It is a good thing at this point to plug it in to the computer and allow Windows to see it and install drivers for it. Once that is done unless you are going to continue straight away, use the “Safe to remove” system to disconnect it from the computer.
OK, start up the computer and once fully booted up, (If it isn’t already) plug in the USB enclosure complete with the new drive in it. Autoplay may open a window for the new drive, if it does dismiss and close it as it isn’t needed. (Make sure no other device is plugged into any other USB ports or card slots, other than keyboard and mouse if they are USB.)
Next is to open the Macrium reflect program.
You should see this page open, if not click the “Disk Image” tab to open it.
Area “A” will be your existing drive, it may be slightly different from mine here as it depends on the number and sizes of partitions.
Area “B” should be your new drive in its enclosure, unlike mine it should show as empty. (Mine is a previous clone as I am showing my rescue drive)
It should also show the model number of the new drive, make a note of that in case you need to search for it.
Click on the Making a Cloned Hard Drive images to enlarge.
Click anywhere in area “A” to make sure that is selected, underneath it you should then see as in my picture as ringed “C” and click on “clone this disk.”
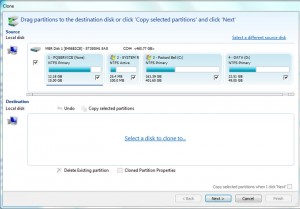
You should then see this next page open. check that there is a tick in all the boxes as you can see here, to be sure all will be copied as the clone.
Click on the “Select a disk to clone to”
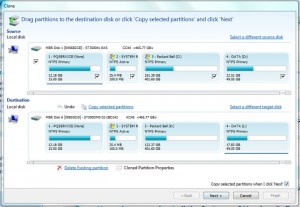
Hopefully you should see something like this, if not you may get the system window open and you will need to search for the new drive, hence why I said to make a note of the new drive model number.
Otherwise Macrium normally knows which it is and shows this providing no other storage medium is plugged in to a USB port or memory card in a slot.
As shown click anywhere to select it and the next should be as here.
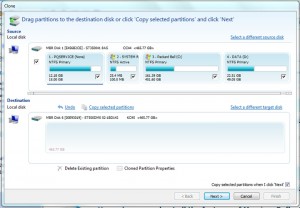
If there are any partitions, which in your case there should not be, click on the red crossed item “Delete existing partition” and in your case with no partitions it should then look like this.
Make sure there is a tick in the box for “copy selected partitions when I click next”, it usually is by default, but no harm to make sure.
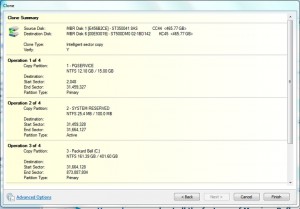
If all is as above at this point, click the next button on the bottom right, and you should then see a list similar to mine which is listing the existing partitions to be cloned to the new drive in its enclosure.
Click the “Finish” button bottom right and it will then start to create the first stages of the clone, it may show a box asking to either format or over write the contents of the destination drive, accept it by clicking yes or whatever it says to mean yes, and it will carry on.
Depending on how much data is on your drive it will take some time, mine being fairly large does take a few hours, yours may be less than that.
Once the clone has been completed, and it does tell you, close everything concerned with Macrium, then have an explore of everything that is on the new drive to check it out.
If happy all is as it should be, use the safe to remove system to disconnect the external USB enclosure.
The next is a good thing to do to make sure the clone was fully successful.
Shut down and then remove the power plug and battery from the laptop or if a desktop disconnect the mains power at the wall.
Remove the now cloned drive from the enclosure, adapter, or docking station. If a laptop, you will have to remove the drive from it first and then install the clone drive.
If a desktop, you only need to remove the cover, then the plugs from the existing drive and temporarily connect the clone drive.
Replace the battery and power plug if a laptop, or reconnect mains power if a desktop.
If everything went correctly, the laptop or desktop should now boot up from the new drive.
If all is correct, it is maybe a good idea to check the full system at this point by running the System File Checker, or sfc /scannow as it is called, to verify the integrity of the operating system.
It may also correct any slight corruption if any has occurred during the cloning process.
This concludes the tutorial on making a cloned hard drive.
If you need more information on Making a Cloned Hard Drive please ask on the FreePChelp website – click here


