Making Selections – a Photoshop tutorial by PseFrank
There are many ways of making selections in Photoshop. What we’ll look at here is the most common ways of selecting parts of an image and also how we can change the properties of our selections to suit different situations.
THE MAGIC WAND TOOL
The magic wand tool has got to be one of the easiest ways of making selections in Photoshop. You’ll find it in the tool bar bundled with the QUICK SELECTION TOOL. The magic wand works very well when there is plenty of contrast between the subject you want to select and its background. In the example below I’m going to use the wand to select me and my aeroplane.
The magic wand tool has got to be one of the easiest ways of making selections in Photoshop. You’ll find it in the tool bar bundled with the QUICK SELECTION TOOL. The magic wand works very well when there is plenty of contrast between the subject you want to select and its background. In the example below I’m going to use the wand to select me and my aeroplane.
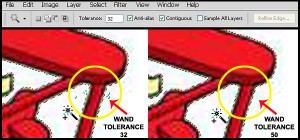
At first glance it looks like we have a plain white background. But on closer inspection you will see that there are traces of a bluey/greeny colour on the background. When there is an inconsistency in a background that stops you from making a clean selection with the wand, it can often be overcome by altering the wands Tolerance. Have a close look at the image below.
As you can see from the blown up sections of our example image, when the tolerance was set at the photoshop default of 32, it didn’t quite select all of the background. By changing the wands tolerance to 50, everything was selected as desired.Raising the tolerance selects More, and lowering the tolerance will mean that Less is selected. Experiment with this setting on an image of your own. Often, clicking in a different place will alter the result as well.Adding or Subtracting selections
If you look at the image above you will see a set of 4 rectangular icons in the options bar. Each of the icons when selected does something different.
If you look at the image above you will see a set of 4 rectangular icons in the options bar. Each of the icons when selected does something different.
Here’s a blow up:
1) New selection
2) Add to selection (Already selected in the image)
3) Subtract from selection
4) Intersect with selectionExplanation of settings one to four
1) Brand new selection2) Click on this icon when you want to select another area of your image and not lose the first selection.
This is handy when you want for example… to select a persons eyes.3) If you’ve selected too much or you want to subtract from the inside of an existing selection, this is the tool to use.
Example: If you had selected a persons eyes, but wanted to alter just the whites of the eyes. You could select the inner coloured parts, and these areas would not be affected by the alterations made to the whites.4) When you make a selection over the top of part of an already selected area. The only selection you will be left with is the section where the two selections overlap each other.What does Anti-alias do?
When the Anti-alias box is checked/ticked your selection edges will be smoothed/softened. This is usually a good thing. Examples of when not to check this box would be when selecting text or small graphics.What does Contiguous mean?
In its simplest form contiguous means touching or joined. For example, if two people were holding hands, then they would be contiguous. But if they were standing apart, they would not be contiguous.If you look at the plane image you will see that the background is divided into 4 areas. 3 are between the wings of the plane, while the fourth is the outer area surrounding the plane. If Contiguous was left unchecked when using the wand tool…All 4 areas would be selected in one click of the wand. (Everything that is white or nearly white).The down side to this is that if there is any white (Or nearly white) areas on the plane its self, these would be selected as well. So by checking/ticking Contiguous and then making 4 separate selections we can be sure that only the background is selected, and not any areas of the plane its self.Remember…to make multiple selections the second (Add to selection) icon must be checked/selected.
If you need more information on Making Selections please use the Free PC Help website – click here


