Tutorial written by KenB
How to use System Restore – Windows 8
System Restore allows you to revert your system settings to a previous date. It makes alterations to the Registry and System Files and uses the settings stored at specific times. We will look at System Restore in Windows 8 in this article.
Sometimes when you install a driver for instance, this can affect the running of Windows. If uninstalling the driver doesn’t fix the problem then reverting the system to a date before the driver was installed may solve the problem.
In Win 8 a system called “System Protection” is used to create Restore Points.
If System Protection is turned on ( and it should be ) this is done automatically.
You can, if you wish, create a restore point manually.
System Restore is not a backup facility. It will not restore lost files.
Using [b][color= #000099 ]System Restore[/color][/b] will not remove your files or data – even data that has been added after the selected restore point.
[b][color= #000099 ]How do I use System Restore ?[/color][/b]
Firstly use the mouse pointer and point it to the top right corner of the screen.
You are looking for the [b][color= #000099 ]Search Option[/color][/b].
Click on the magnifying Glass.
In the Search Box type ……[b][color= #000099 ]System Restore[/color][/b] ……..and then click on[b][color= #000099 ] Settings[/color][/b]
See the picture below:

[b][color= #000099 ]Create a Restore Point[/color][/b] will show on the left hand side. Press [b][color= #000099 ]ENTER[/color][/b]
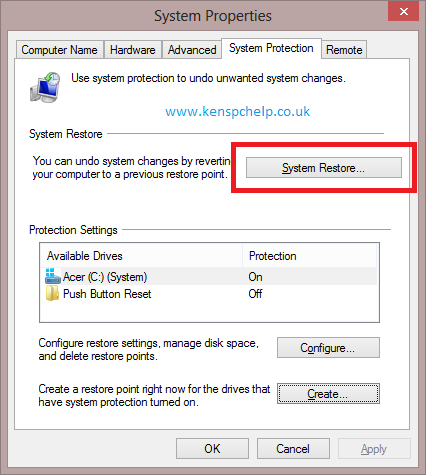
You will then see the screen below:
Click on [b][color= #000099 ]System Restore[/color][/b].

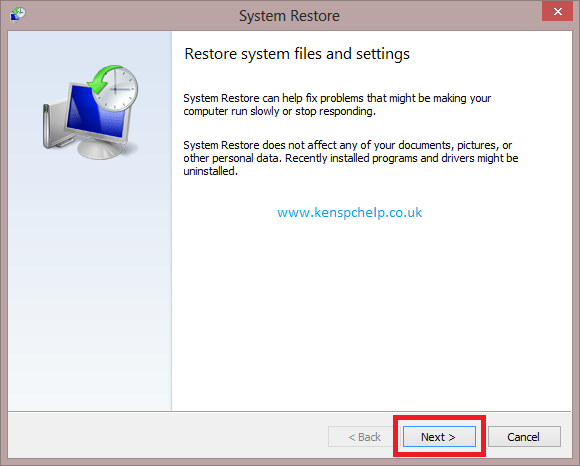
You will then get a reminder of what [b][color= #000099 ]System Restore[/color][/b] can and cannot do ———– click[b][color= #000099 ] NEXT[/color][/b].

You will then see the restore points that are available.
Highlight the date that you want to restore the system to.
[b][color=#ee4a2d]HINT – select a date that is just before the start of your problem. Do not select the oldest if there is a more appropriate date.[/color][/b]
There is an option to [b][color= #000099 ]”Show more Restore Points[/color][/b]”. Check ( tick ) this if you need older dates [ assuming they are available ].
Click …[b][color= #000099 ].NEXT[/color][/b]

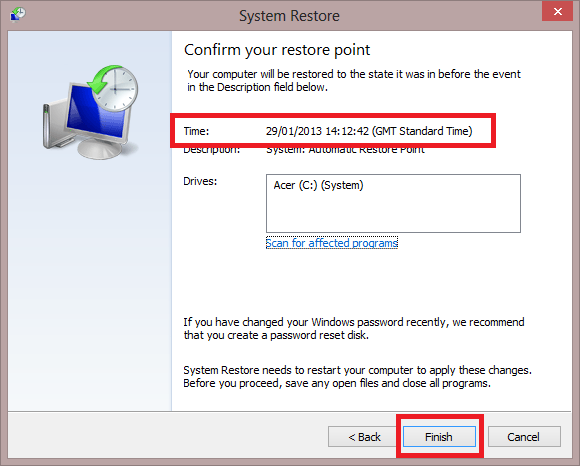
You will get a confirmation window that shows you the date that the system will be restored to.
If you are happy with this then click …….[b][color= #000099 ]FINISH[/color][/b]

[b][color= #000099 ]System Restore[/color][/b] will now restore your system to the selected date.
This will involve a re-start and may take a little time to complete.
The system will go through the normal Boot process and on completion you will get a box pop up telling you that [b][color=#000099]System Restore [/color][/b]has successfully reverted your system to the chosen date.
[b][color= #E62E00 ][size=20]What do I do if there are no Restore Points ?[/size][/color][/b]
If you have no restore points then you need to check that [b][color= #000099 ]System Protection[/color][/b] is enabled.
To do this type “[b][color= #000099 ]System Restore[/color][/b]” into the [b][color= #000099 ]Search Box[/color][/b] ( see the first image at the top of the tutorial )
Instead of clicking on [b][color= #000099 ]”System Restore[/color][/b]” ( second image ) click on “[b][color= #000099 ]Configure[/color][/b]” [ see below ]

You will be taken to the [b][color= #000099 ]Restore Settings[/color][/b] options.
Make sure that “[b][color= #000099 ]Turn on System Protection[/color][/b]” has a check next to it.
If you needed to change that then click OK.

This will not magically produce restore points for you as you had it turned off.
you now have[color= #000099 ] System Protection[/color] on and the next time you boot up a [b][color= #000099 ]Restore Point[/color][/b] will be created.
If you require further information use the Free PC Help site – click here


